Some things will never start if you don’t begin to do them.
0x00 前言
- 这是
CTF-WIKI上用来讲解off-by-one的一道例题,但是显然上面的讲解对新手并不友好,在查阅各种资料、看了各位大佬们的博客后,终于把这道题目搞懂了。 - 因为这道题目面向新手的WP并不多,所以特地写下这篇博客,尽可能全面的讲解一下这道题目。
0x01 题目下载链接
0x02 off-by-one 知识储备
- 相关知识在
CTF-WIKI上也有较为详细的讲解,此处略过。 - 为了更好的理解本文,建议先看看
CTF-WIKI上的相关讲解,同时也要好好理解指针的相关概念。
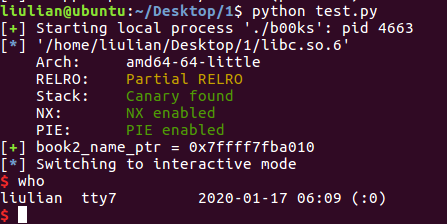
0x03 分析程序与调试
1 | Arch: amd64-64-little |
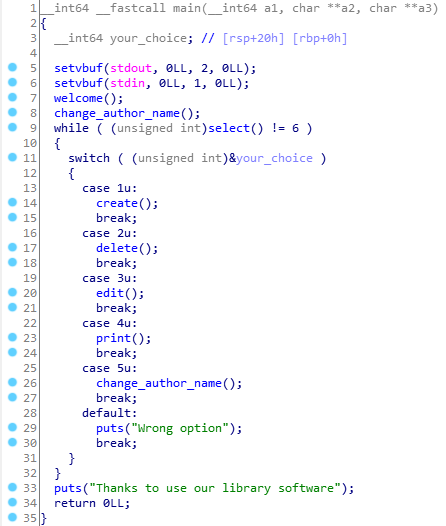
一些函数我都进行了
重命名,这里这些函数比如create、delete都可以先点进去看看,要了解这些函数能实现什么功能,从而为后续利用做准备。同时为了方便调试,临时禁用了系统的地址随机化功能:
echo 0 > /proc/sys/kernel/randomize_va_space
寻找漏洞
- 进入
change_author_name函数,然后观察my_read函数,发现在存在off-by-one漏洞,由于程序没有对边界进行正确限定而产生了此处漏洞,该漏洞会越界并将低字节覆盖为\x00。 - 很遗憾的是,只有
change_author_name函数存在这个漏洞,其他函数例如create函数都额外做了边界限制处理。
1 | signed __int64 change_author_name() |
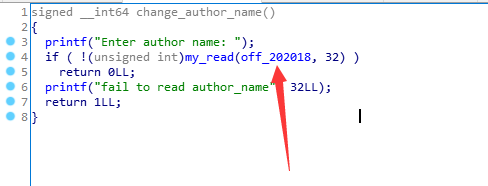
- 注意到这个
off_202018,很容易想到这是与author_name有关的。

双击进去,它指向了
unk_202040,由于我们的程序开启了PIE保护,所以真正存储author_name的位置应该是程序真正的加载基址 + 0x202040,这个程序真正的加载基址可以通过gdb调试得出。继续看
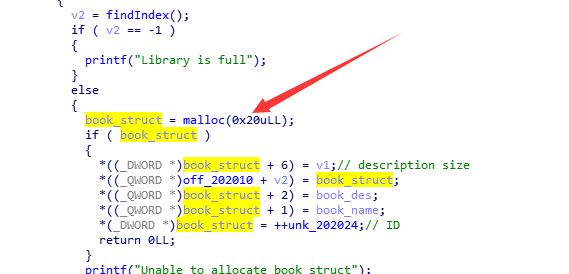
create函数,由于这个函数代码量有点大,不再把全部代码放出来。在该函数中,我们能根据下面这一块能得到book的结构体。
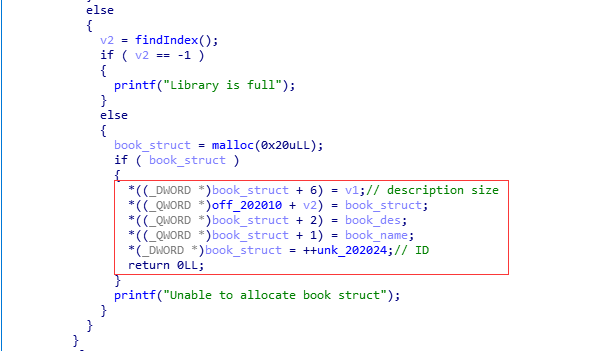
其中
*((_DWORD *)book_struct + 6) = v1;可以转化为*((_QWORD *)book_struct + 3) = v1;所以我们得到
book结构体
1 | stuct book{ |
- 注意到此处的
off_202010,从上面红框中的代码也能看出来,v2是当前创建的book的索引,那么off_202010所对应的应该就是存放book结构体的结构体数组。

双击过去,它指向了
unk_202060,在前面我们得知unk_202040存放的是author_name。也就是说,
author_name首地址与book结构体数组首地址相差0x20字节。而很巧,程序恰好限定了author_name的最大长度就是0x20,而且!! 我们的change_author_name函数存在off-by-one漏洞,这也就意味着,我们能够通过这个漏洞对book结构体数组的首地址(也就是第一个book结构体的地址)进行一些操作或利用。
泄露第一个book结构体的地址
- 能进行什么样的操作或者利用呢? 接着看
case4: print()函数
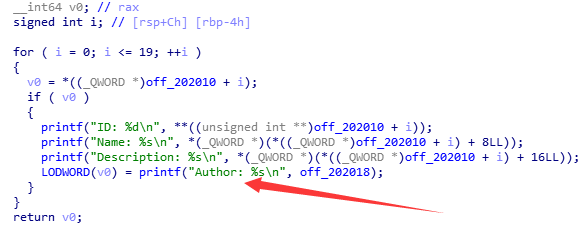
这个函数能够打印出
author_name,nice!。我们设想一个程序执行流程,首先,我们应程序要求,输入了
author_name,我们故意输入也就是32个A。在内存中应该是这样。

注意蓝色部分,那里实际上就是
off-by-one漏洞越界覆盖的低字节,覆盖成了\x00,实际上那里本来就是\x00…覆盖了以后还是\x00。关于前面的地址,这是程序在我机器上面运行的
程序加载地址0x555555554000+0x202040(前面提到过)得到的,不同机器有可能不一样。这个程序加载地址可以在gdb中使用pie或vmmap命令查得。继续, 下面的
0x555555756060就是book结构体数组的首地址,存放第一个book结构体(后面记作book1)的地址,当我们create book1时,book1的地址会覆盖掉这一块。而在C语言中,字符串是靠\x00来进行截断的,覆盖掉了author_name的\x00,那么我们就可以通过print()函数打印出author_name连带着把book1的地址打印出来了。
一些小补充
- 注意
create函数里面,对于每个book结构体,它的chunk大小应该是0x20(用户申请) + 0x10(chunk头) = 0x30,但是由于前面还malloc了book_name与book_description,book1的地址和book2的地址相差可能并不是0x30,除非当book_name和book_description申请的内存足够大时它俩才相差0x30,不然就要另外计算咯,这好像和malloc的分配算法有关。 具体book1的地址和book2的地址差多少可以通过在本地动态调试算出来。这里也推荐通过动态调试来计算差值。
继续
如果知道了book1的地址和book2的地址之间的差值(这个差值无论是在本地打还是远程打应该都是不变的),我们就可以通过刚刚通过打印得到的book1的地址来推算出book2的地址。
继续模拟一下流程,当我们创建了book1以后,内存应该是这个样子(具体值可能有所不同)。
1 | 0x555555756040: 0x6161616161616161 0x6161616161616161 |
- 非常巧的是,
book1的book_des_ptr为0x00005555557580c0,如果我们申请book_description的大小足够大的话,它是有可能包含0x0000555555758100的。 - 为什么要包含这个地址? 因为我们的程序是拥有
case5 :change_author_name的,可以多次使用off-by-one漏洞,当我们再次使用这个漏洞时,就会将0x0000555555758160的低字节覆盖为\x00,从而变成0x0000555555758100。
伪造book struct
在此之前,我们先创建一个
book2,让它的book_name的size和book_description的size尽可能大!这里尽量大也是为了后面泄露libc作铺垫。
这里都取0x21000(为啥取这个?懒了,wp上就是这个懒得换了。。),因为这俩size足够大,所以book2地址 = book1地址 + 0x30 。(这在前面小补充里面有讲,当然也可以动态调试出来)
优秀的大佬们由此想出来一个方法,就像
套娃一样,在book_description中伪造一个book结构体(记作book_struct)。由于
0x0000555555758100 - 0x00005555557580c0 = 0x40,所以可以这么构造。
1 | payload = 'a'*0x40 #Padding |
填充0x40个a是为了让
0x0000555555758100正好指向我们伪造的book_struct。book2_struct_addr是前面推算出来的book2的地址,+8以后就指向(注意这是指向!)了book2_name_ptr,至于为什么要让它指向book2_name_ptr,别着急,慢慢看下去。程序是拥有
edit函数的,可以修改book_description的,我们将其修改为我们的payload即可完成伪造book_struct。我们伪造好以后,
change_author_name,依然输入32个a,然后book结构体数组的首地址就变成了0x0000555555758100,也就指向了我们伪造的book_struct。这个book_struct是存在于book1的description中,而已经没有指针指向book1了,下面全靠这个伪造的book来发挥作用了。
泄露libc基地址
当分配的堆块的大小在某一个范围内的话,系统会通过brk方法来分配(brk 会直接拓展原来的堆),但是当分配超级大的堆块时,程序会用mmap方法来分配堆(mmap 会单独映射一块内存),mmap分配的堆块和libc之间存在着固定的偏移,因此我们可以推算出来libc的基地址(偏移需要用gdb中的vmmap来计算)
说白了就是可以在本地想办法算出来mmap和libc之间的偏移,这个偏移无论是打本地还是打远程都是固定的。
所以book2的name的size取得特别大,目的就是为了用来泄露libc。

我们可以通过程序的
case4 :print()来打印出来book2_name_ptr。理解这里需要熟练理解与运用指针,因为我们伪造的book_struct的book_name_ptr与book_des_ptr都指向book2_name_ptr,而我们打印出来的都是%s, 也就是字符串,也就是内容,也就相当于我们把book2_name_ptr打印了出来。emmmmm 取 Name 或者 Description其中一个的打印结果然后处理一下就行。。
然后我们在gdb中用vmmap命令可以得到本地调试时libc的基址

- 偏移就是本地调出来的
book2_name_ptr- libc基址。 - 那么打远程的时候,libc基址就是
book2_name_ptr- 偏移。
getshell
由于这道题
Full RELRO,我们无法通过覆盖got表来getshell。优秀的大佬们想出了用
__free_hook来劫持free函数。关于
__free_hook:
1 | void weak_variable (*__free_hook) (void *__ptr, |
可以看出
__free_hook是一个常量。 简单地说,当__free_hook的值不为NULL时,在调用free函数时,会首先执行__free_hook所指向的指令。这里也提到了
free函数,与其相关的肯定是程序中的delete函数
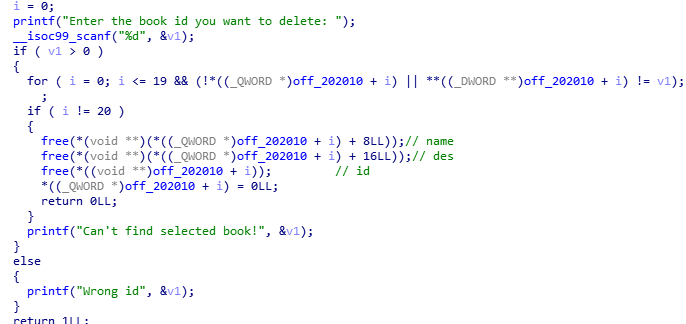
- 这个函数会先free掉book_name,然后free掉book_des,最后是id,结合这个顺序,优秀的大佬们想出了构造方法。
1 | free_hook = libc.symbols['__free_hook'] + libcbase |
- 我们在执行完
edit_book(target, 1, payload1)以后,由于edit函数修改的是description的内容,而我们此时修改的是伪造的book_struct,它的description的内容是book2_struct_addr + 8这是个指针,修改完后变成了指向/bin/sh的指针了。 由于p64占8字节,所以p64(free_hook)会覆盖到book2_struct_addr + 16即book2的description位置。
- 看着估计有点晕?仔细想想就是下面这种结构。
1 | 伪造book: |
在执行完
edit_book(target, 2, payload2)以后,修改的实际上是book2_struct_addr + 16地址所指向的内容,也就是free_hook_ptr所指向的内容,即free_hook的内容,也就是说,执行完后,我们的__free_hook里面存着system指令。那么按照前文所讲,我们在调用
free之前,将会先调用system函数,那么如何给system传参?由于我们的
delete函数会先free掉book_name_ptr,但是book2_name_ptr已经被我们修改成bin_sh_ptr,而且调用free之前会先调用system函数,由于void free(void *ptr),int system(const char* command),这两个函数的参数都是个指针。那么free(book2_name_ptr)就被我们成功变成了system(bin_sh_ptr)了! Nice~
0x04 exploit
- 我是exp的搬运工:
1 | # -*- coding: UTF-8 -*- |
0x05 参考链接
- 感谢各位大佬的WP!